Acer Buergerianum Bonsai: Summer Pruning and Nebari Recovery
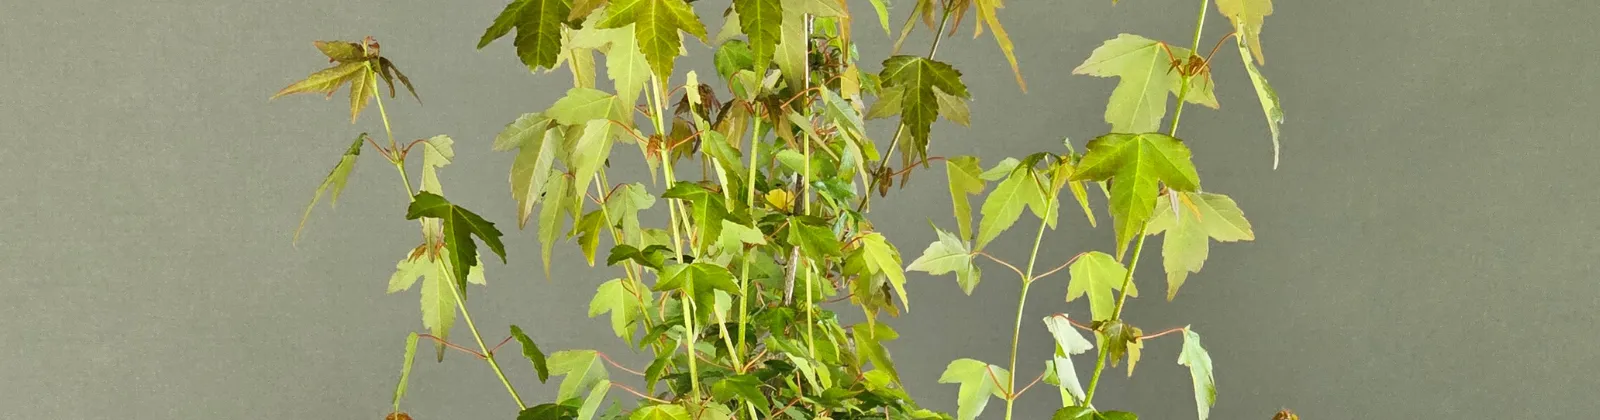
Acer buergerianum — the trident maple — demands two completely different conversations at the same time. Above the soil, the canopy runs hard in late spring and needs immediate containment if you want to keep ramification tight. Below the soil, the nebari develops on its own slow timeline, and the tools you reach for there have nothing to do with pruning shears. This article walks through both sides of the work on a young Acer buergerianum bonsai — the same plant, two years into a development arc that has already produced one mistake worth learning from. The canopy work shown here was done in early May; the nebari check was carried out a few months earlier, in late winter. If you are new to the species, start with our Acer buergerianum care guide for the fundamentals.
The pruning logic here is the same one we apply across the genus, with a few twists specific to buergerianum: more vigour at the apex than a typical Acer palmatum in development, and a stronger tendency for callus tissue to re-fuse if you incise the base without protection. We will cover the summer cut sequence, the two-leaf rule and when to ignore it, and the nebari check one year after a tourniquet incision — including the small omission that cost almost twelve months of progress.
Enjoying this tutorial? Subscribe to our YouTube channel for weekly bonsai content →
Why Summer Pruning Cannot Wait on Acer Buergerianum
By the time a vigorous Acer buergerianum has pushed its first long shoots of the season, the clock is already running. Each unchecked extension thickens the branch from which it grows, and on a tree where the structural primary branches are still being built, that thickening is rarely what you want. This species is more apically dominant than most palmatum cultivars: leaders escape upward fast, the interior keeps short, fine ramification, and the gap between coarse outer growth and refined inner growth widens within weeks.
Summer pruning is the lever that closes that gap. The job is not to refine the silhouette — that comes after defoliation later in the season. The job is to stop the leaders before they damage the existing ramification. If you do this once a vigorous shoot has hardened, the wound takes longer to close, the cut leaves a visible scar, and the branch you wanted to keep thin has already gained a millimetre of unwanted girth.
Reading Vigour Before You Cut Anything
Before any pruner touches the tree, walk around it and read the canopy. On a young Acer buergerianum in development, three signals tell you where to act first:
- Long internodes near the apex — these are the runs that need to be stopped. They are the ones consuming the most sap and starving the interior pads.
- Leaf size — the leaves on vigorous extensions are visibly larger than the leaves on already-ramified branches. That contrast tells you, at a glance, which branches are spending energy and which are storing it.
- Old scars closing — a callus that is rolling vigorously is a sign the surrounding tissue is active. Treat that area gently for the next cut to keep the scar discreet.
This is also the moment to decide what stays for grafting. If a primary branch is missing — and on most young pre-bonsai at least one is — pick a vigorous, well-positioned shoot and protect it now. It will be your grafting material next spring.
The Two-Leaf Rule and the One Exception That Matters
The standard cut on a maple in summer is to shorten extending shoots back to the first pair of leaves. But the rule is incomplete on its own. The two new shoots that emerge from those remaining leaves grow from the buds in the leaf axils, which means their direction is dictated by the orientation of the leaves you leave behind.
If the first pair of leaves sits horizontally, you keep them — the two future branches will grow left and right, exactly the lateral expansion you want. If the first pair sits vertically, one of the future branches will go up and the other down. That is rarely useful in a structured pad. In that case, reach back one more node and cut to the second pair, where the orientation works in your favour.
The rule, restated: cut to the first pair of leaves whose orientation matches the direction you want the new branches to take. On a busy trident maple this means looking carefully at every shoot before the cut, not just running the pruners along the silhouette.
Building Tighter Pads: Returning to Older Internodes
Beyond the new vigorous shoots, an established trident maple often holds older back-buds — small shoots that broke from interior wood the previous season and were left to develop quietly. These are the building blocks of denser pads. When you find a branch with both a current-year run and a viable older back-bud closer to the trunk, the back-bud is almost always the better leader for next year’s structure.
Cut the run, keep the back-bud, and accept that the pad will look thinner for the next few weeks. By the second flush, that back-bud will have started to extend, and the pad will rebuild itself with shorter internodes than the original branch ever produced. This is the path to the dense, layered ramification that defines a refined trident maple — and it requires you to give up apparent volume now in exchange for real density later.
Summer Pruning vs Nebari Work: Two Jobs, Different Seasons
The same trident maple at two different points in the year needs two completely opposite mindsets. Above the soil, during the summer pruning session, you are stopping growth and refining structure. Below the soil, during the late-winter nebari check, you are encouraging growth and protecting a wound. The cuts at the canopy are immediate; the work at the base unfolds over years. Confusing one logic for the other is a common mistake on young material.
The table below summarises the contrast. Use it as a working checklist before you start either operation: it will keep you from over-pruning the canopy in a hurry to also work the base, or from under-protecting an incision because you are still in pruning mode. For a deeper look at how air layering builds nebari, see our full walkthrough.
| Summer pruning (canopy) | Nebari work (base) | |
|---|---|---|
Goal | Stop runs, protect structure | Provoke and protect new roots |
Mindset | Restrain growth | Encourage growth |
Timing window | Days, once vigour is visible | One full growing season |
Key tool | Sharp scissors, two-leaf rule | Sharp blade plus metal wire |
Most common mistake | Cutting to vertical leaves and forcing bad direction | Skipping the wire and letting the callus re-fuse |
Sign of success | Shorter internodes on the next flush | White, active roots above the disc |
Nebari Check One Year After the Tourniquet — and the Wire Mistake
Earlier in the year — during the late-winter check — this same trident maple had its nebari inspected for the first time since the tourniquet incision applied one year prior. The setup was a plastic disc placed above the cut to separate old roots from the future nebari, with pure akadama on top to maximise capillary root development. The check told two stories. First, new roots had formed — concentrated in one quadrant rather than radiating evenly, but real, white, and active. That is a positive signal, not a failure.
The second story is the mistake. The callus that should have stayed open had almost entirely re-fused with the lower trunk tissue — the plastic disc was practically engulfed. The cause is straightforward: no metal wire was placed inside the incision. Without that physical obstruction, healthy callus does what healthy callus always does — it closes back over itself. The new roots emerged from the few points where the wound stayed open longest, which is why they are concentrated in one zone instead of distributed evenly around the trunk.
The correction has two parts. First, the existing new roots are shortened to encourage them to branch and divide — just as you would prune aerial branches to promote ramification, trimming these young roots forces them to split rather than simply elongate. Second, the callus is re-incised along the same line, this time with metal wire inserted into the cut to keep it physically open through the next growing season. The lower roots — the ones below the plastic disc — are left untouched: they are still white, still pushing, and still feeding the tree. No repotting is needed. The plant simply goes back into its container with fresh akadama on top for another year of patient work. If you want to start this kind of development work yourself, we grow Acer buergerianum young pre-bonsai from seed — ready for exactly this process.
Key Takeaways
- Trident maple is more apically dominant than palmatum — vigorous shoots near the top must be stopped before they thicken structural branches
- Cut to the first pair of leaves whose orientation matches the direction you want the new branches to take, not simply the first pair you see
- Older back-buds closer to the trunk almost always make better future leaders than current-year runs
- Summer pruning and nebari work demand opposite mindsets — restrain the canopy, encourage the base
- After a tourniquet incision, metal wire inside the cut is non-negotiable — without it the callus re-fuses and you lose a year
- Roots concentrated in one quadrant after a tourniquet are still a positive signal — they prove the technique works where the wound stayed open
- When you re-incise to correct a re-fused callus, leave the lower roots untouched — their sap pressure drives the next round of emission
Frequently Asked Questions
When is the right moment to summer prune a trident maple bonsai?
The window opens as soon as the first flush of spring growth has produced visibly vigorous shoots — long internodes, larger leaves, and obvious extension at the apex. In most temperate climates that is early to mid summer. The exact day matters less than the state of the tree: prune when the runs are clearly there but before they have hardened. Waiting until the wood lignifies makes every cut larger, slower to close, and more likely to leave a visible scar on a branch you wanted to keep thin.
Why does the callus re-fuse after a tourniquet incision on a trident maple?
Healthy callus tissue exists to close wounds. If you incise the collar of a vigorous trident maple and leave nothing physical inside the cut to keep the two faces apart, the callus follows its natural programming and rolls back together. Within a few months the wound has effectively healed in the wrong direction — back into a single trunk instead of out into a ring of new roots. A piece of copper or aluminium wire inserted into the incision interrupts that closure mechanically, which is why the wire is the part of the technique you cannot skip.
Should I repot a trident maple after re-incising a failed tourniquet?
No, and this is one of the few situations in development where doing less is better. The lower roots — the ones below the plastic disc — are still feeding the tree and pushing sap upward. That upward pressure is what will drive the next round of root emission from the re-incised callus above the disc. Disturbing the lower roots breaks the engine that makes the technique work. Refresh the akadama on top, replace any plastic that has been engulfed, and put the tree back into the same container for another full season.
How do I choose which leaves to keep when summer pruning a maple shoot?
Look at the orientation of the leaf pair, not just its position. Leaves emerge in opposite pairs along the shoot, and the buds that will produce the next branches sit in the axils of those leaves. A horizontal pair of leaves gives you two future branches growing left and right — useful for building a layered pad. A vertical pair gives you one branch growing up and one down — almost never what you want on a structured tree. Pick the closest pair to the trunk that is oriented the way you need the future ramification to go, even if that means cutting back further than the textbook two-leaf rule would suggest.
Are concentrated new roots after a tourniquet a sign that the technique failed?
No — they are a sign the technique works where the wound stays open. New roots form preferentially at the points along an incision where callus tissue did not close back over itself. If you find them clustered in one quadrant rather than radiating evenly around the trunk, that quadrant is telling you exactly where the wound remained open longest. The remaining sectors did not fail to produce roots; they produced callus instead. The fix is to re-incise those sectors with wire in place, not to abandon the development plan or repot prematurely.

Luca Valagussa
Bonsai is not the result: that comes after. Your enjoyment is what is important.
John Yoshio Naka